The Latest

Showing posts with label bread recipes. Show all posts

Gluten free and dairy free Irish soda bread with raisins

Gluten free and dairy free Irish soda bread with raisins
This Spotted Dog Irish bread is yeast-free and gluten-free.

The Mother of Invention


By Meet Karina

If I call this new gluten-free bread an Irish soda bread, traditionalists will snicker. Raisins are not at all traditional in an Irish soda bread, you see. If a soda bread has raisins in it, it's called Spotted Dog over yonder, cross the pond in the Emerald Isle (or so I'm told). I never knew this, growing up on the white clapboard wilds of the Connecticut shore. I was blithely ignorant of this quaint canine moniker, despite a hefty streak of familial Irish blood (we ate more pierogi and kielbasa than Irish soda bread and tea). And out on my own- when I started baking my tender little eighteen year old heart out- my Irish soda bread had raisins.

And why not?

When it comes to traditions, I'm the first to admit- I am an upstart. I wiggle and chafe beneath constraint and "should" like an itchy school girl with pinching new shoes. I admire traditions. From afar. At least, in theory. In an abstract, symbolic way. The meaning and the message is more interesting to me than formula. When it comes to formula, I usually prefer to wing it.

Which is why I enjoy gluten-free baking.

My skill set groove runs deep on the intuitive side. 

I bake like I paint. Observing. Listening. Responding to what is in front of me. If a recipe calls for x amount of flour and I sense the dough is too wet, I'll add more flour until the dough feels "right" to me. Experience helps. No doubt about it. The process of trial and error gives you a feel for gluten-free dough, an inkling about the muffin batter and how it might behave on any given day. Which varies, I hate to tell you.

So I pay attention to elements like humidity, and room temperature. Weather.

Bread dough will behave differently on a hot and humid day than it will on a windy, cold one. Your kitchen changes with the seasons, you know. So recipes may have to change a wee bit, too. The amount of milk or brown rice flour may need to be adjusted. Tweaked a tiny bit toward wet or dry.

Baking gluten-free is more of an art than a science.

I recommend you tune in to your ingredients and learn how they behave. Learn how humidity affects flour- notice it's dampness. Or dryness. Dry flours will soak up more liquid. Damp flours are heavier, and may need less moisture. A cool and drafty kitchen may require a longer rise time than a hot and sultry one. A thin metal bread pan may bake the outside of a loaf faster than the inside can keep up. Your oven may run a tad hotter than you imagined. Or lag behind and never quite pre-heat itself (do your gluten-free baked goods end up gummy in the center?).

Gluten-free baking requires your full attention. A dash of patience. An intimacy with your ingredients. A willingness to adjust. And most of all, developing an intuition you can trust.

Even if it goes against tradition.


Gluten free Spotted Dog soda bread is an Irish classic with a twist
Gluten-free Spotted Dog- an Irish bread with a twist.


 Gluten-Free Irish Soda Bread Recipe- with Spots! 


Use your favorite milk, or non-dairy milk- but note that non-traditional coconut milk and a touch of coconut flour add a subtle fragrant tenderness to this easy, rustic quick bread. If you cannot use coconut due to allergies, try your usual milk choice, and substitute the coconut flour with sweet rice flour.

Preheat the oven to 375ºF. Line a 7-inch or 8-inch cake pan with a piece of parchment paper.

Ingredients:

1/2 cup brown rice flour or gluten-free oat flour
1/2 cup sorghum flour, gluten-free oat flour, or millet flour
1/2 cup almond or hazelnut flour
1/2 cup tapioca starch or potato starch (not potato flour!)
1/4 cup organic coconut flour
1/4 cup organic light brown sugar 
1/2 teaspoon fine sea salt
2 teaspoons double acting baking powder
1/2 teaspoon baking soda
1 1/2 teaspoons xanthan gum
3 organic free-range eggs or egg replacer
6 tablespoons light olive oil
3/4 cup coconut milk, soy milk or non-dairy milk
1 teaspoon fresh lemon juice
1/2 to 3/4 cup currants (or raisins)

Instructions:

Whisk the flours and dry ingredients together in a large mixing bowl. 

Combine the wet ingredients together in a separate bowl.

Make a well in the center of the dry ingredients and slowly pour the wet into the dry ingredients, gently mixing as you go. I use a soft silicone or rubber spatula to do this. If you need a little more coconut milk to moisten the dough, add a tablespoon at a time and stir in.

When the dough is evenly moist and sticky, add the raisins and stir by hand to mix them in.

Scrape out the dough and plop it into the center of the lined cake pan. Use oiled or wet hands to mound the dough into a rustic round loaf. Dot with extra raisins, if you like and press them in a bit. 

Slice a smallish criss-cross into the center of the dough.

Place the pan into the center of a preheated oven. Bake for about 30 to 33 minutes, until the loaf is golden and firm. Insert a wooden toothpick into the center to test for doneness.


Gluten free Irish Soda Bread with new flours
Sweet and tender gluten-free "Spotted Dog" soda bread with tea.


Cool the pan on a wire rack for five minutes, then turn the loaf out of the pan to continue cooling (you don't want a steamy bottom!).

Serve slightly warm with your favorite buttery spread and some fruity jam.

Recipe Notes:


Rustic soda breads are really best eaten warm from the oven. This latest version is tender and slightly sweet- perfect for tea time. 
If you have leftovers, I would wrap and freeze the remaining bread to preserve the texture and taste. Thaw and warm it up in the oven or grill slices with a pat of butter.

This recipe is gluten-free and dairy-free. 
To make it vegan, use your favorite egg replacer equivalent to 3 beaten eggs- about 6 tablespoons of liquid. See below for a link to my vegan Irish Soda Bread with Millet.


Cook time: 30 minutes

Yield: 8 to 10 slices


Gluten free Irish soda bread
Warm slices of Irish soda bread with raisins.

More gluten-free  bread recipes:


Delicious Gluten-Free Vegan Bread Recipe - dairy-free and rice-free
Sun Dried Tomato Focaccia Bread Recipe - Gluten-Free
Gluten free cornbread recipe with Green Chiles + Cinnamon
Moroccan Recipes: Bread with poppy seeds recipe

Gluten-Free Vegan Bread Recipe

Delicious Gluten-Free Bread Recipe - dairy-free and rice-free, too
My best gluten-free bread recipe. Note: The loaf pictured has eggs.


Man shall not live by bread alone, so the famous saying goes. In other words, we need ideas to feed us, too. We need awareness. Conscious action. An expression and celebration of the spirit.


And yet (here's the sticky part, folks) almost every spiritual tradition includes the bread we shall not solely live by, whether it be a hand-torn loaf, a paper thin wafer, a piece of matzoh, a curve of naan, or a sprinkle of cornmeal. Breaking bread and sharing grain is a cherished and beloved symbol for community, celebration and tribal nourishment. From Holy Communion to the Super Bowl gatherings around an elevating principle or a family milestone (from birth to marriage to funerals) include the simple but connecting gesture of sharing food.

Because cooking makes us human.


And eating illustrates our kinship with the entire animal kingdom. Humans are animals, after all, interlinked and cousined by astonishingly similar DNA and subatomic particles from the vast universe itself. As Carl Sagan liked to phrase it, we are the stuff of stars. We are billion year old carbon. Flesh and bones. And we need to eat to survive. We need our daily bread in order to contemplate the concept that curiosity and compassion and creativity are also food. This is the tangled and elegant duality I've been chewing on of late.

When I was first diagnosed with celiac disease I gave up bread with only a brief whimper (although chocolate croissants still haunted my dreams like so many flaky buttery vampires). I was stoic. I gnawed gluten-free pizza crusts akin to sneaker soles and sandwiches that deconstructed on the plate and turned gummy in the mouth. I did it for my health. My body. My longevity (I'd like to stick around for awhile).

As many newly diagnosed celiacs do, I frequented an on-line forum where newly minted celiacs gather to vent their frustration and whine about missing bread aka The Holy Grail. Seeing the drama and desperation publicly displayed only kindled my attraction to practice the Zen-surfer art of detachment. Although I well understood the pain on parade (and I empathized with just how difficult going gluten-free is), I didn't want to identify with the victim consciousness I saw spilled across the message boards. It was a psychic turn-off, emotionally draining not to mention, spiritually uninspiring.

Although I appreciated the why's and how's of the grief and anger expressed, I could not embrace it as my own. It felt too dangerous- like slipping into an undertow, dragged down to churn and churn in denial and desire. So I abandoned the forum and gave up the quest for ciabatta. And pizza crust. And bagels. And matzoh balls. And I steered my hunger toward naturally gluten-free foods.

And I felt free. Proactive. Unburdened.

Deciding soon after diagnosis that gluten-free alternatives to the "real thing" just weren't worth the effort and the investment of expectation worked for me. Instead of focusing on what I couldn't have, I chose to focus on what I could enjoy. Naturally gluten-free foods. Like fresh peanut butter. Bananas. And yes, even rice cakes. I'm one of the lucky ones. I'm blessed with a practical, tenacious spirit and a problem solving nature. I adapt.

The art of detachment buoyed me through the early years of dreadful gluten-free recipes that relied on white rice flour and starches (am I the only one who cannot stand the taste and grit of baked white rice flour?). This was many years ago, you see, before savvy marketers in the multibillion dollar food industry began taking notice of the celiac awareness explosion. You know, before gluten-free was consideredhip, an option cannily made to be trendy or to lose one's muffin top. As if gluten-free is a choice those stuck with celiac disease wake up and decide one happy spring morning. A choice to be mocked and snickered at. A choice now marketed by certain ambitious celebrities who claim going gluten-free will do everything from detox your gonads to lower your cholesterol.

This sort of blatant one-size-fits-all marketing (translation: will make me one rich bitch) really gets under my skin. If I had a so-called choice, Darling, would I still shun croissants for the promise of a size zero mini skirt and a chance to blather on Larry King and Oprah as if I could actually string two uncoached thoughts together? I don't think so. I'd be diggin' on the pastry. With a caramel macchiato.

So what exactly changed my mind about bread and the whole Zen-surfer detachment thing?

One word. Sorghum. And buckwheat. And millet. Wait, that's three words. And then there are the new certified gluten-free oats. We have killer gluten-free bread mixes by Pamela's. We have, I'm not sorry to tell you, new and serious temptations into rekindling hope. Hope for the return of the aforementioned Holy Grail. There are spanking new grains and mixes to tempt us as the serpent once tempted Eve. Cookies and crackers and cupcakes and bakery breads that whisper, Go ahead.

Take a bite.

And that is the best news. For all of you newly diagnosed readers and mothers and fathers of children who woke up yesterday and learned that you or your loved one cannot tolerate gluten, let me tell you. This is a better time to give up gluten than ever before. Your choices are abundant- and expanding daily.

Which, for yours truly and certain kindred folks in my boat, is a tad ironic.

Because just as we learn about and experiment with new gluten-free flour choices and begin to flirt with bread again some of us are finding out that the gut damage caused by years of undiagnosed celiac disease did not only hollow our bones enough to break a hip at 53 and prompt autoimmune cataract surgery at the tender age of 45, the euphemism they call malabsorption also invited food proteins to pass through leaky nether lands and alert our bodies to attack. So now, for some of us, milk and cream and butter are verboten.

Not that I'm kvetching.

Who am I to kvetch when there's still plenty of stuff to eat? As long as I can eat potatoes, I can deal with it. So I experiment with the ingredients my body can handle. I measure and stir and scoop with a faint air of detachment laced with a delicate glimmer of hope. I throw together new-to-me flour combos and hope to conjure a decent gluten-free bread- an edible bread not only without gluten- but with no milk, butter, or rice flour. A vegan gluten-free allergy-friendly bread.

And Babycakes, I did it.

Not only is this a multiple-allergen-free bread, it is tender and fragrant and super delicious. No Zen detachment necessary. And it's time to celebrate.
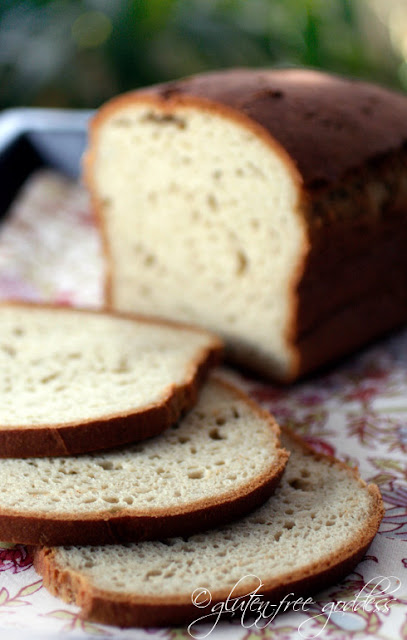

Favorite delicious gluten free bread
Gluten-free bread that is soft and tender.

Delicious Gluten-Free Bread Recipe


This gluten-free bread is tender, fragrant, dairy-free and rice-free, and easily egg-free with proper leavening. Though most gluten-free bread recipes rely on eggs for texture and rise, this recipe is also delicious baked vegan, without eggs (though in all honesty, two whipped eggs will make it rise higher). I use Ener-G Egg Replacer to make it egg-free.
First- whisk together your dry ingredients and set aside:

1 1/2 cups sorghum flour (aka jowar flour)
1 cup tapioca starch or potato starch (not potato flour!)
1/2 cup GF millet flour or GF oat flour
2 teaspoons xanthan gum
1/ 1/4 teaspoons fine sea salt
1 packet rapid dry yeast or 2 1/4 teaspoons

You'll need sesame seeds for the top; set aside for later. Or omit.

For the Breadman bread machine:


Pour the liquid ingredients into the bread machine pan first:
1 1/4 cups warm water (at 110 to 115ºF)  
3 tablespoons extra virgin olive oil
1 tablespoon honey- or raw agave nectar to keep it vegan
1/2 teaspoon mild rice vinegar or lemon juice
2 organic free-range eggs, beaten or 1 tablespoon Ener-G Egg Replacer whisked with 4 tablespoons warm water till frothy
Gently pour the mixed dry ingredients on top of the liquid.
Set your bread machine program for 1.5 loaf medium crust. I used the gluten-free cycle on the Breadman; if you don't have a gluten-free cycle, a rapid rise cycle will also work.
Check the dough after a few minutes of kneading- it should be closer to a muffin batter than bread dough, soft, but not cake batter wet. Adjust dry to wet ratio with a tablespoon of flour or warm liquid, as needed. Humidity influences the dough. As does temperature (your bread will rise higher on a hot day).
If you like a crusty loaf (or your past experience results in a gummy center/fallen top) remove the bread from the pan and place it in the oven at 350ºF for an additional 10 minutes- keep an eye on it and don't let it get too brown. It should be a light golden color.
Cool the loaf before slicing for best results.
Enjoy fresh from the oven- the first day (as with most gluten-free baked goods) has the best texture and taste.
Freeze leftover bread as slices, wrapped in a paper towel and bagged in freezer bags. Thaw to room temperature. 
Baking time:1 hour
Yield: 1 loaf


          Notes:


This yummy bread was not only the most successful yeasted bread to date- the taste, texture and tenderness make it one of my all-time top faves in gluten-free bread land. It didn't crumble. And it didn't taste ricey (well, duh...there's no rice!). The combination of sorghum and millet with tapioca/potato starch imparts a springy bread texture that reminded us both of our favorite ciabatta bread recipe from our pre-gluten-free days.

 Baking Tips for 

Fabulous Gluten-Free Bread in a Bread Machine


Have all the dry ingredients at room temperature.
Water should be 110 to 115 degrees F (too cool and the yeast won't rise; too hot and the yeast will die).

Start with slightly less water and watch the dough as it mixes. Add the full amount if you need to, but be sensitive to the texture. Dough may be wetter in humid weather.


Baker's bread yeast: always check the expiration date.


After a minute or two of mixing, open the machine and scrape down the sides of the pan with a soft spatula to help incorporate the bits of flour on the edges; I had to do this twice.


Immediately after the mixing/kneading cycle was finished I reached in and removed the paddle; then smoothed and pressed the dough and with wet fingers to even out the shape. It's not necessary to do this; I just prefer removing the paddle from the loaf ahead of time.


When the dough was resting I sprinkled a generous tablespoon of sesame seeds all over the top.


When the machine beeped "done". I immediately removed the pan from the hot machine, and within a minute released the bread from the pan (if you don't do this, it steams and gets a bit soggy) and placed it on a wire rack to do the thump test. It should sound hollow when tapped. And the loaf should feel firm (not squishy).


I thought the sides were a tad soft so I placed the naked loaf directly into the oven- on the center rack- and turned on the temp to 350 degrees. I baked it for another 12 to 15 minutes, keeping an eye on it. When I tapped the bread it sounded hollow. The crust was crusty. Done.

Cool the loaf on a wire rack -- not in the pan. Slice when cooled with a sharp serrated knife. (If you don't wait for the loaf to cool the bread will not slice evenly.)


I am thinking this bread would make fabulous burger buns and pizza crust.
For a browner crust- tapioca starch helps gluten-free crusts brown. Dark honey or molasses may as well.
A note regarding altitude for egg-free. At high altitude- you may only need one egg's worth of egg replacer. Experiment.

Readers sometimes ask if they can lessen either the oil or the sweetener in a recipe- in this case, I'd suggest, no. What really makes this bread tender and not crumbly is the give it gets from the honey and oil. When you don't use eggs or butter, you need to boost the stickiness factor- and flavor. That's why I use good tasting olive oil and honey (agave would work).

You can also use real eggs in this recipe. Pics shown is a loaf baked with eggs. I used two organic free-range eggs, beaten till frothy.
Note- if the dough seems too wet (thin), I add a tablespoon of tapioca starch or sorghum flour. Dough should resemble a thickish, smooth, elastic batter.

If you find the center sinking, the dough may be too wet. Your flours might be damp due to humidity. Use less liquid- start with a tablespoon or two less liquid. Various non-dairy milks affect the dough differently as well, I find. Hemp milk makes a stickier dough. If this is your scenario, use less or try thinning the milk with water.

If the bread is gummy in the center, it may need a longer baking time. Or you may need to check your oven temperature (your thermostat might be off).

If you use flax seed gel or chia seeds as an egg replacer, this can also contribute to a gummy dough. Allow the seeds to sit and soak thoroughly first- add them after they become gel.

Try my new gluten-free Ryeless Rye Bread Recipe or my super yum gluten-free Multi-Grain Sandwich Bread Recipe; both are also casein-free.


Gluten free bread loaf that is soft and fragrant
Gluten-free bread worthy of a sandwich.


Instructions- if you don't have a bread machine:


Follow the instructions for whisking together the dry ingredients.

Using one cup of the water, proof the yeast in the warm water (110 to 115ºF) and a teaspoon of the honey/agave (add the yeast to the water and honey stir; allow it to get poofy).

Add the proofed yeast to the dry ingredients; add the olive oil, remaining honey/agave, cider vinegar and mixed egg replacer (or eggs); beat until a smooth batter forms. I use the word batter because gluten-free bread dough is more like smooth sticky muffin batter than wheat based bread dough -- it is not as thin as cake batter, though. Add up to 1/4 cup more water if you need to.

Scrape the dough into a ceramic loaf pan (or use a 7 to 8-inch round cake pan for rustic ciabatta style bread) and smooth evenly (I use wet fingers).

Top with sesame seeds. Place the pan in a warmed oven or draft free spot. Allow the dough to rise until it domes nicely -- from 45 to 50 minutes.

Preheat your oven to 350ºF.

When the oven comes to temperature bake the risen bread until it sounds hollow when thumped -- about 45 minutes to 55 minutes, and even up to 65 minutes if you're at higher altitude. Lower style round pan loaves will bake quicker -- at 30 to 40 minutes, usually.

If you like a crusty loaf, remove the bread from the pan and return it naked to the oven at 350ºF for an additional 10 minutes- keep an eye on it and don't let it get too brown. It should be a light golden color.

Cool on a wire rack.


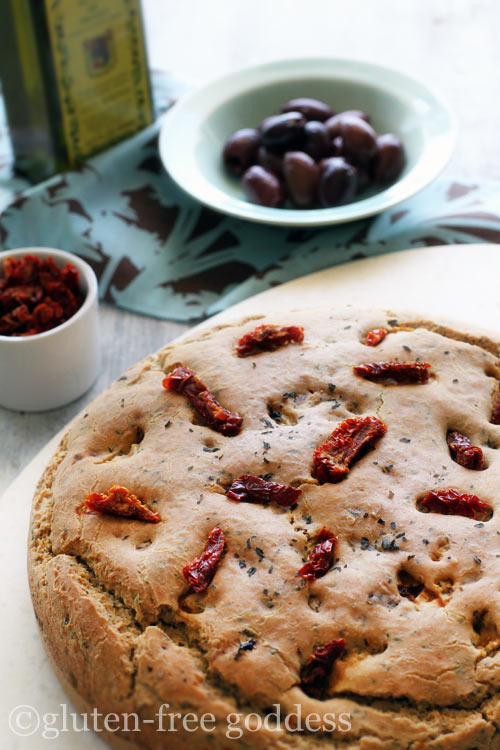
Sun Dried Tomato Focaccia Bread

Gluten-Free Sun-Dried Tomato Focaccia Bread - quick and easy desserts
Today's new recipe? Gluten-free sun-dried tomato bread.
  

A Focaccia To Love


Moving season is upon us. Yes, Los Angeles has a moving season. Southern Californians do not like to move in cold weather- in other words, when the mercury dips below the 60º mark. 58 degrees? It's time for UGGs and cocoa and ordering in. Not for hoisting sofas up or down a flight of stairs. Are you crazy? 

And yes. We are moving. Come June 1st or thereabouts we are joining the migrating, apartment swapping masses. We are weeding through the promises that bloom on Craigslist (a veritable bouquet of alluring superlatives). Amazing! Gorgeous! Light and bright! And the ever popular- HUGE! This whole searching (and so far, not finding) process inevitably makes me insanely hungry for bread. Not store bought bread. Freshly baked warm from the oven bread. The kind of rustic, crusty loaf that conjures the word hearth. And home.

Because when you're searching for a place to live, nothing whispers home to your soul like the yeasty sweet aroma of baking bread. 


quick and easy desserts- Gluten-Free Sun-Dried Tomato Bread
This gluten-free sun-dried tomato bread is crusty and tender.


Gluten-Free Sun-Dried Tomato Bread Recipe


We found some fabulously sweet sun-dried tomatoes at Trader Joe's for this new bread recipe. They were delightfully tender and not too chewy. I like my sun-dried tomatoes to resemble fruit, not leather. They gave this rustic bread a rich, Italian inspired flavor.

Ingredients:

1 1/2 cups sorghum flour
1 1/2 cups potato starch
1/2 cup almond meal or GF millet flour
1/2 cup brown rice flour
4 teaspoons dried basil
2 teaspoons xanthan gum
1 1/2 teaspoons fine sea salt
1-2 teaspoons minced garlic, to taste
1 1/4 cup warm water (115ºF)
1 teaspoon raw sugar
1 packet rapid dry yeast
2 organic free range eggs, beaten
3 tablespoons good olive oil
1 teaspoon mild rice vinegar (or lemon juice)
1/2 cup lightly packed sun-dried tomatoes (dry packed)

Instructions:

Warm the oven by turning it on and off. Line a 9-inch cake pan with a piece of parchment.

In a mixing bowl combine the sorghum flour, tapioca starch, almond meal, brown rice flour, dried basil, xanthan gum, sea salt and garlic.

In a large measuring cup add the sugar to the water and dissolve. Add the yeast, stir and set aside until the yeast gets happy and poofy. (The sugar feeds the yeast.)

Add the proofed yeast and liquid to the flour and begin beating to combine. Add the eggs, olive oil and vinegar. Beat for a minute or two until the dough is smooth.

Lightly chop the sun-dried tomatoes. Toss them into the dough. Stir to distribute.

Scoop the dough into the prepared pan, shape and smooth the top with oiled hands.

Set the pan in the warm oven, on the center rack, and allow the dough to rise. A quick rise of 20 minutes will produce a flat bread style rustic loaf (shown). A longer rise, until doubled in height, should give you a slightly higher loaf, depending upon your altitude and ambient temperature.

When the dough has risen, turn the oven on, to 375ºF.


Bake for 30 to 35 minutes until firm and golden. Note: At about 20-25 minutes I brushed the top with olive oil. This helps make a lovely golden crust.

Serve this flavorful bread warm from the oven, with authentic extra virgin olive oil. (See this book Extra Virginity for the truth about olive oils- thanks to my pal Gluten-Free Anna for the heads up on this book.)

Makes one 9-inch rustic bread


Tender moist gluten-free cornbread you can bake in a skillet or a cake pan.
Gluten free cornbread recipe with Green Chiles + Cinnamon

Gluten-Free Cornbread with Green Chiles + Cinnamon


One of the first recipe conversions I attempted in my brand spanking new gluten-free life (begun six short years ago, December 19th, 2001) was my tired-and-true favorite cornbread recipe. Lucky for me, it converted to gluten-free rather easily. As a tender, fragile newbie to life sans gluten it gave me hope. The will to live. After all, when your beloved world of cooking, baking- and eating- is flipped upside down, a modest success in the kitchen can perk up your day. Maybe even, your week.

So when I recently discovered I needed to give up dairy and eggs as well, I flipped through recipes once again and decided to reprise my skillet cornbread- this time as an egg-free vegan version. And wouldn't you know it?

It worked.


Skillet Cornbread Recipe with Green Chiles and Cinnamon


This cornbread is moist and tender. You can top it with ground cinnamon before you bake it (shown in the first photo) or leave the top plain (though if you haven't tried the flavor combo of green chiles and cinnamon- give it a whirl!).

We love leftover wedges grilled in a little olive oil. If you like your cornbread really spicy try using chopped jalapeños instead of the mild roasted green chiles. See other substitution ideas- including subs for a sweet vanilla cornbread in Notes below.

Dry ingredients:

1 cup stone ground gluten-free cornmeal
3/4 cup sorghum flour
1/2 cup tapioca starch or potato starch (not potato flour!)
1 teaspoon xanthan gum
1 teaspoon baking soda
1 1/2 teaspoons baking powder
1 teaspoon fine sea salt
1 teaspoon chili powder or cinnamon- or my fave: both
1/2 cup organic light brown sugar

Wet Ingredients:

1 tablespoon Ener-G Egg Replacer whisked with 1/4 cup warm water* 
1/2 cup plus two tablespoons light olive oil, or grapeseed oil
1 cup very warm water or rice milk
1/2 teaspoon lemon juice
2 extra tablespoons water, if needed- the batter should be like cake batter, and not too thick

Add:

1/2 cup chopped roasted green chiles- mild or spicy, as you prefer
A sprinkle of chili powder and cinnamon, for topping

Instructions:

Preheat your oven to 375ºF.

Lightly oil a 10-inch iron skillet.

Combine the dry ingredients (cornmeal through brown sugar) in a bowl and whisk.

In a large mixing bowl, combine the Egg Replacer with the olive oil and beat for one minute.

Add in the dry ingredients and beat by hand just until a smooth batter is formed, about one minute. Add in the chopped roasted green chiles. (If your batter seems a little dry, add a tablespoon more liquid at a time until you achieve a smooth consistency.)

Heat the prepared skillet over medium-high heat.

Pour the batter into the heated skillet and sprinkle a little chili powder and/or cinnamon over the top of the batter.

Bake the cornbread in the center of a pre-heated oven for 25 to 35 minutes (depending upon your altitude), until firm to the touch in the center, and slightly golden around the edges.

A wooden pick inserted into the center should emerge dry.

Place the skillet on a wire rack and allow the cornbread to rest 15 minutes before cutting. This helps keep the slices from crumbling apart.

Serve warm.

Grill leftover slices in a little olive oil for a savory winter treat.

Yields 8 to 10 slices.


Karina's Notes:


  • Not vegan? Use two organic free-range eggs instead of the egg replacer, and change out the water/rice milk for buttermilk. 
  • I started out making this cornbread with rice milk, but now I use warm water for the liquid. It seems to rise better, and develops a lighter texture.
  • If you have a plain rice or soy yogurt you like, whisk it to liquify and use it in place of the water/rice milk as a richer alternative.
  • Note- for egg replacer you need a replacer that binds and leavens for best results.
  • I have also baked this cornbread using a deep 9-inch Chicago Metallic cake pan. Watch baking time.

Bread with poppy seeds

Type: Breads
Preparation time : 25 minutes
Cooking time : 30 minutes
Resting time : 30 minutes
Total time : 85 minutes

Ingredients:


soft wheat flour : 750 g
salt 1 c . coffee
baker's yeast : 20
caster sugar 1 c . soup
warm water : 40 cl

To shape the bread


soft wheat flour : 80 g
Poppy seeds : 80g

Moroccan Recipes: Bread with poppy seeds recipe

preparation:


In a large bowl , place the flour, salt , sugar and yeast diluted in a little water. Gradually add water to get a smooth paste. Knead for 10 to 15 minutes , basting with water until it becomes soft and pliable . 

Cover the dough and let rise until doubled in volume. Tap the dough with your hands to get rid of bubbles. Divide the dough into balls of equal size , roll in flour and place on a plate. Flatten the dough balls , brush with water with a brush and decorate with poppy seeds . Let rise bread in a warm place . Using a spray bottle , moisten the bread and bake in preheated oven at 220 ° C for 20 to 25 minutes approximately .


More Recipes From Fabulous Food Bloggers: